Expert tips to speed up and streamline electrical repairs

Editor's Note: This is Part One of a two-part-story. Read Part 2 HERE.
Lighting and electrical system repairs on trucks, tractors, and trailers are a high priority for service operations due to their impact on safety and uptime. The maintainers of fleets must be lightning quick when trying to figure out why a trailer light is out and how to fix it in order to avoid a CSA violation. At the same time, tests and diagnostic procedures required to speed up repairs can be time-consuming and highly detailed.
Fortunately, technical experts and experienced technicians across the industry have developed best practices and tools to improve the speed and accuracy of electrical and lighting repairs. What follows is a series of tips that detail procedures these subject-matter experts have found effective to facilitate the diagnosis and repair of these vital systems.
Read more: Fleet best practices to correct electrical and lighting issues
Identifying electrical and electronic faults
There are three faults to look out for in electrical and most electronic circuits, noted Terry Rivers, senior manager of vehicle services training, Cox Automotive Mobility Fleet Services.
These include:
High Resistance: This is the opposition to the flow of an electric current. “If there is no current flow, then there’s no resistance, which also means no voltage drop,” Rivers said. “Typically, you would diagnose this high resistance fault with a voltmeter. Today, you could diagnose this with an infrared temperature gun or a thermal infrared camera.” This is the most common fault.
Open Circuit: This is caused by an electrical circuit that is not complete due to a break in the wire, a spread terminal pin, or an interrupted circuit. This is the second-most common fault.
Short Circuit: This is an undesirable condition where the current travels along an unintended path with little to no impedance. “This will lead to the circuit being on all the time with the switch off when there is no blown circuit protection (fuse), or the circuit being off all the time even with the switch on with blown circuit protection,” Rivers said. This is the least common fault.
The first and most important step is to determine if a circuit is power- or ground-side switched. If it is a power-side switched circuit and the customer complains the dome light stays on all the time, it’s impossible for this to be an issue on the ground side. Secondly, determine inputs, processing, and outputs. These steps can reduce the length of wire you need to find the fault.

Streamlining electrical system repairs
According to Michael Whitman, director of product management at Optronics International, here are some tips to help you streamline the process and accuracy of electrical and lighting system repairs:
Understand Common Problems and Symptoms
- Dim or flickering lights indicate a potential issue with the battery, alternator, or wiring connections.
- Total loss of lights could be due to a blown fuse, faulty switch, or broken wiring.
- Intermittent electrical issues suggest loose or corroded connections, damaged wiring, or a faulty component.
- Faulty turn signals or brake lights may point to a malfunctioning relay, broken wiring, or a defective bulb.
- Wiring and harness problems usually come in three categories, each with its own signs and troubleshooting procedures to follow:
- Failure due to a grounded circuit
- Failure due to an open circuit
- Failure due to a short circuit
Diagnostic Procedures
Step 1: Gather information and perform a visual inspection, interview the driver to understand the symptoms and any recent changes they may have observed, and inspect the affected lighting system components, looking for visible damage, loose connections, or signs of overheating.
Step 2: Test the power source using a multimeter to measure battery voltage and check for proper charging from the alternator, ensure battery terminals are clean and secure.
Step 3: Check the fuses and relays using a circuit tester or test light to check for blown fuses or faulty relays.
Step 4: Inspect wiring and connectors for damage, loose connections, or corrosion. Look for wires and cables that are bent sharply and those that contact metal edges, such as where wires pass through walls or into body cavities. Use a multimeter to check for continuity and measure resistance.
Step 5: Test the lighting components, using a test light or multimeter to check if power is reaching the bulbs and connectors.
“Remember to consult the service manual or wiring diagrams for the vehicle you are working on as procedures and electrical system designs can vary,” Whitman concluded.
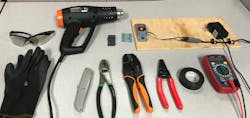
Electrical work station essential tools
- Here is a list of common tools that should be readily available to complete lighting repairs:
- Safety Glasses and Gloves
- Needle-nose and slip-joint pliers
- Wire strippers (10-24 gauge)
- Crimping tool
- Heat Gun with shrink tubing (various sizes)
- Utility Knife
- Multimeter
- 12V power supply
- High/low amp clamps
- Insulated splice with solder
- Electrical tape
- Potentiometers with different resistances to substitute sensor values
- TMC RP 186 Wire and Cable Repair Guidelines
Effectively using a digital multimeter
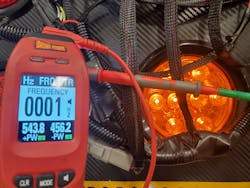
Use a digital multimeter to test voltage when a lamp or other electrical component is operating at a reduced output, noted Dean Kennedy, corporate training manager, Aim NationaLease. “If the voltage available at the device in question during operation is not equivalent to the supply voltage, begin troubleshooting the circuit traveling upstream toward the source,” he said. “Once you locate the point in the circuit where supply voltage is present, you can further isolate the root cause.
“Using your DMM on a voltage scale, begin comparing two points in the circuit,” Kennedy went on. “Connect one lead to the location where you earlier measured supply voltage and the other lead downstream toward the device where reduced supply voltage was noted. Using this method, you can isolate the portion of the harness causing the voltage drop.”
Do no harm while diagnosing
Corrosion occurs when moisture enters at points such as connectors, damaged wires, or improperly repaired wires and spreads, shorting out the light, related Dan Miller, field service manager, Peterson Manufacturing. “One of the common ways moisture enters wiring is during diagnostic testing when technicians use a piercing probe that can create an open path for moisture to enter the wiring.
“A multimeter is a better tool because it will tell you if you have the right voltage, not just whether or not voltage is present,” Miller continued. “When a tech goes through troubleshooting steps, voltage information will be available with the use of the multimeter.”
In Part 2, we will cover specific repair tactics for various electrical and lighting issues.
About the Author

Seth Skydel
Seth Skydel, a veteran industry editor, has more than 36 years of experience in fleet management, trucking, and transportation and logistics publications. Today, in editorial and marketing roles, he writes about fleet, service, and transportation management, vehicle and information technology, and industry trends and issues.