Completing a hub bearing replacement on a 2007 Toyota RAV4
Vehicle affected: 2007 Toyota RAV4
Tools used for hub bearing replacement:
- Wheel lock removal kit (such as the Steelman 78537 or Sunex 2840)
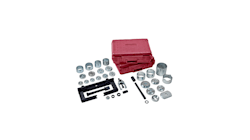
- Ken-Tool Hub Shark, OTC Hub Tamer or Mueller-Kueps 609 400 Press and Pull Sleeve Kit (Allows removal and replacement of bearings on the vehicle without removing suspension or steering components saving time and alignment settings)
- OTC 6297 Tie Rod Removal Tool
- Snap ring pliers
- Impact wrench and socket
- Toe gauge
- Torque wrench
- Lubricating oil (used on threads of tool)
(This repair is diagnosed in the Tool Briefing: How to diagnose different suspension noise issue)
There are quite a few tools and steps that can be used to save time during any steering or suspension repair. Taking a few minutes to apply scribe or paint marks on alignment points prior to dismantling will allow the technician to save time during the repair because the adjustments that will be necessary for proper alignment will be minor, rather than major. As an example, apply a paint mark at the upper strut mount bolts and the body to show where to align the strut during reassembly. Using a toe gauge to check the original setting prior to replacing parts such as tie rods will allow for a faster alignment once parts are replaced and the toe is set to what it was prior to the repair.
Once we determined that the hub bearing was faulty on the RAV4 and we made our preliminary alignment checks and marks we were ready for the repair.
If the customer does not have a wheel lock key, use a wheel lock removal kit, such as the Steelman 78537 or Sunex 2840, to remove the wheel locks then remove the wheel.
In this and many wheel hub bearing replacements, we have found that the Ken-Tool Hub Shark (The OTC Hub Tamer is similar tool set) provides the technician the ability to replace the hub bearings quickly and efficiently. This tool allows the technician to replace the bearing without completely removing the hub from the vehicle. The process to replace the bearing with the Hub Shark is to remove the axle nut and axle. In some cases it will be necessary to remove the tie rod and ball joint in order to remove the axle completely out of the hub.
If it is necessary to remove the ball joint or tie rod be sure to use the proper removal tool, such as the OTC 6297, to prevent damage to any steering or suspension components. After the axle is removed use a pair of snap ring pliers to remove the bearing retaining ring from the hub. Place the proper adapters and spacers from the Hub Shark set into the bearing and hub. The shaft of the Hub Shark is then placed in the adapters to be used as a press to remove the bearing. Do not forget to use a lubricating oil on the threads of the shaft to make sure the nut does not bind and damage the tool. This also allows the tool to have less load on it making it easier to remove the bearing. Once the bearing is removed, inspect the hub to make sure there is not damage from the bearing binding or spinning in the hub. Do not forget to inspect the channel that holds the snap ring for damage making sure the retaining ring will seat completely.
Use a wire brush and scraper to clean any debris from the hub housing. Place the new bearing in the hub and use the appropriate adapters to press the new bearing on the hub making sure that you oil the threads on the shaft of the Hub Shark again. Insert the snap ring in place and check to see that both the bearing and the snap ring are seated completely.
Reinstall the axle, washer, retaining nut and any steering components that were removed. Replace retaining cotter pins or lock nuts as appropriate and torque them to specifications as found in your repair information found in Mitchell 1 ProDemand.
Even if you marked the original points of alignment at the start of the job it is a good idea to perform an alignment on the vehicle after the repair to make sure there will be no tire or drivability issues. As with any repair verify it is complete by driving it under the same conditions that created the original concern.
